Sigfox
Sigfox is a relatively low-cost wireless network technology that requires low power to connect and is implemented by low-cost hardware modules.
This tutorial provides a step-by-step guide to integrate Sigfox with the TagoIO platform. By following these instructions, you will enable uplink and downlink operations, allowing data exchange between your Sigfox devices and the TagoIO application.
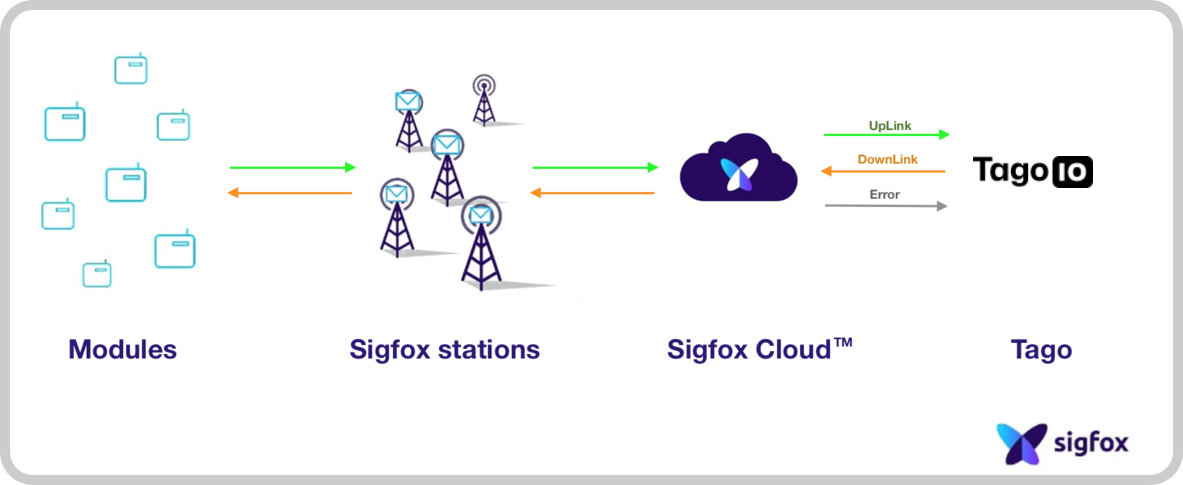
Uplink is the process of sending data from the devices to TagoIO. Downlink is used to send data back to the devices. Learn how to perform downlink for SigFox.
Follow these steps to set up the Sigfox backend and TagoIO.
On this page
- Step 1: Create Authorization in TagoIO
- Step 2: Set Up Integration in Sigfox
- Step 3: Add Device in TagoIO
- Finalizing Setup
- Troubleshooting
Step 1: Create Authorization in TagoIO
-
Access Authorizations Go to the Devices section of your TagoIO account.
-
Create a New Authorization
- Click the Create Authorization button.
- Provide a meaningful name for the authorization (e.g.,
Sigfox-Integration). - Click Save.
-
Copy the Authorization Token After creation, copy the authorization token; you will need this in later steps.
The Authorization should be generated by TagoIO by accessing the Service Authorization page; no additional parameters are needed.
Step 2: Set Up Integration in Sigfox
On the Sigfox Backend Portal, create a callback of type uplink. We will
use the Data Uplink option to obtain the basic information in the messages.
If your contract with Sigfox allows you to get more information like RSSI, SNR,
STATION, you can use the
Advanced Data option.
-
Create a new callback Go to your Sigfox console and create a new callback under the menu:
Device Type > Callback > New > Custom Callback. -
Configure the Callback
| Field | Description |
|---|---|
| Type | Data & Uplink |
| Channel URL | Use the endpoint format https://sigfox.middleware.REGION.tago.io/uplink. Replace REGION with your deployment region (e.g., eu-w1). |
| HTTP Method | POST |
| Send SNI | Check the box Send SNI (Server Name Indication) for SSL/TLS connections |
| Headers | Add the following headers: • authorization: <your authorization token from TagoIO>• device: {device}• Content-Type: application/json |
| Body | Copy and paste the JSON text below. |
[
  {
    "variable": "device",
    "value": "{device}",
    "group": "{time}"
  },
  {
    "variable": "data",
    "value": "{data}",
    "group": "{time}"
  },
  {
    "variable": "seqNumber",
    "value": "{seqNumber}",
    "group": "{time}"
  }
]
Step 3: Add Device in TagoIO
To integrate your device with the TagoIO Platform, follow these guidelines:
-
Ensure Device EUI Consistency
- When creating the device in TagoIO, use the exact same Device EUI that is configured in Sigfox.
- The Device EUI must match exactly to establish a successful connection between Sigfox and TagoIO.
-
Select the Appropriate Network and Device Type
- Choose the Sigfox Network during the device setup process.
- Select the correct device type from the available options. If your device is not listed, you can add support through connectors.
-
Add Device Support via Connectors (If Necessary)
- If your device type is not available in the default list, enhance its compatibility by utilizing connectors.
- For more information on available connectors and how to use them, refer to the Connector Overview.
For detailed instructions on adding devices, visit the Adding Devices page.
Finalizing Setup
-
Power On Your Devices Turn on your Sigfox device and gateway to initiate data transmission.
-
Verify Data Reception
- In TagoIO, navigate to the Device and into the Data tab to confirm that data is being received.
- Alternatively, use the Live Inspector within your device settings to monitor incoming data in real‑time.
Troubleshooting
If you encounter issues with your Sigfox integration, check the callback logs in the Sigfox Backend Portal. Common error codes and their solutions:
Error 401 - Unauthorized
This error indicates an authentication problem:
- Invalid Authorization Token: Verify that you copied the correct
authorization token from TagoIO and pasted it exactly in the
authorizationheader (without extra spaces or characters). - Wrong Region: Ensure the
REGIONin your callback URL matches your TagoIO deployment region. For example, if your TagoIO account is in Europe, useeu-w1; for US East, useus-e1. - Expired or Deleted Authorization: Check if the authorization still exists in your TagoIO account at the Service Authorization page.
Error 400 - Bad Request
This error typically indicates a data format or processing issue:
- Invalid JSON Body: Verify that the JSON body in your callback matches the format shown in Step 2. Ensure all brackets, quotes, and commas are correct.
- Content-Type Header Missing: Confirm that the
Content-Type: application/jsonheader is set in your callback configuration. - Payload Parser Error: If you're using a custom payload parser, there may be an issue with your parsing script. Check the device's Live Inspector to see detailed error messages about payload parsing failures.
No Data Received
If the callback succeeds (HTTP 200) but no data appears in TagoIO:
- Device EUI Mismatch: Verify that the Device EUI in TagoIO exactly matches the device ID in Sigfox (case-sensitive).
- Check Live Inspector: Use the Live Inspector to see if data is arriving but being rejected or filtered.
Information about Downlink can be found at the Sigfox - Downlink documentation.
You also can create your own parse scripts to process variables from the payload.